---
title: How to get started with Oskol 2
description: Introducing Oskol 2!
---
[Skip to content](https://knowledge.irisbond.com/en/ipad/oskol2/oskol-2-casing#main-content)
- [English](https://knowledge.irisbond.com/en/ipad/oskol2/oskol-2-casing)
- [Deutsch](https://knowledge.irisbond.com/de/ipad/oskol2/oskol-2-casing)
English
Show submenu for translations

Open main navigation
Close main navigation
- - [English](https://knowledge.irisbond.com/en/ipad/oskol2/oskol-2-casing)
- [Deutsch](https://knowledge.irisbond.com/de/ipad/oskol2/oskol-2-casing)
English
Show submenu for translations
- Ir a irisbond.com
Ir a irisbond.com
Hi, how can we help you?
- There are no suggestions because the search field is empty.
1. [Knowledge base](https://knowledge.irisbond.com/en?hsLang=en)
2. [Hiru & iPad](https://knowledge.irisbond.com/en/hiru-ipad?hsLang=en)
3. [Oskol 2](https://knowledge.irisbond.com/en/hiru-ipad?hsLang=en#oskol-2)
# How to get started with Oskol 2
## Introducing Oskol 2!
**Oskol 2** is an Augmentative and Alternative Communication (AAC) system designed for individuals with oral communication difficulties. Powered by **Hiru eye tracker**, Oskol 2 precisely estimates the user's gaze point on the screen, allowing seamless navigation and replacing traditional mouse or touch interactions. It is optimized for the **iPad Air 13** and comes equipped with a built-in battery, providing up to **10 hours of uninterrupted communication**.
### How to start with Oskol 2?
If you do not have one yet, please ensure you have created and signed into an [Apple ID](https://support.apple.com/en-us/108647?device-type=iphone) on your iPad before proceeding with the configuration steps below.
### Prepare the iPad
#### 1. Download necessary software
With Hiru, you have free access to the **Hiru App**. Simply [download it from the App Store](https://apps.apple.com/us/app/hiru/id1537070396). This software is specifically designed for performing [calibration](https://knowledge.irisbond.com/en/hiru/calibration?hsLang=en). If you want to learn more about the features and functions of the Hiru app, you can find additional information [here](https://knowledge.irisbond.com/en/ipad/hiruapp/what-is-the-hiru-app?hsLang=en).
#### 2. Configure recommended settings on the iPad
- Check all the one-time settings [here.](https://knowledge.irisbond.com/en/ipad/settings/one-time-set-up-2?hsLang=en)
- Turn your [Assistive Touch ON](https://knowledge.irisbond.com/en/ipad/settings/personalization-of-the-assistive-touch-menu?hsLang=en). Go to Settings \> Accessibility \> Touch \> AssistiveTouch \> Toggle ON
- **Turn off Apple's Eyetracking in iPad Settings**. Go to Settings \> Accessibility \>Eye Tracking\>OFF
- Lock the iPad in landscape orientation by tapping the lock icon in the Control Center (Swipe down from the top-right corner of the screen)
- Set up your dwell time according to the instructions [here](https://knowledge.irisbond.com/en/ipad/settings/dwell-time?hsLang=en)
### Get Started: Hardware
🔍 Get to know the locations of all the components to help you start off on the right foot! **[Check here.](https://knowledge.irisbond.com/en/ipad/oskol2/oskol-2-components?hsLang=en) 👆**
#### 1. Activate the battery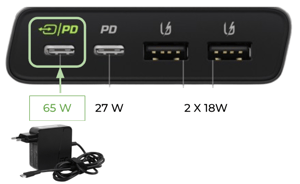
Connect the external battery to the power supply via a USB-C 65W port to activate it.
Do not detach the battery from the Oskol casing!!
Make sure the battery is fully charged.
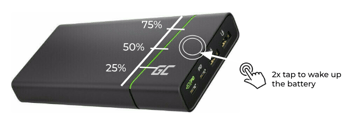
*\*Double tapping the powerbank shows its capacity on the LED bar.*
**
👇After the battery activation, follow this video:
---
#### 2. Connect the battery
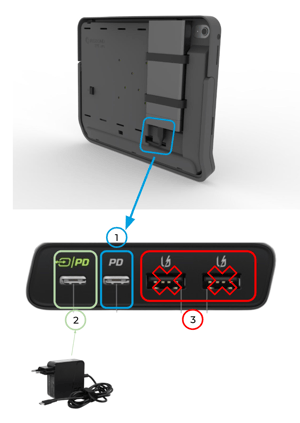
1. Connect the short cable on the Oskol 2 to the USB-C port **labelled "1"** as shown in BLUE on the photo but is white on the actual battery. 🔵 This will begin charging the iPad.
2\. To charge the battery, connect the charger to the USB-C port on the battery **labelled "2"** as shown in GREEN on the photo and the actual battery. 📗 This will allow you to charge the battery while the battery charges the iPad.
3\. Avoid using USB-A ports marked in red on the photo. 🔴
---
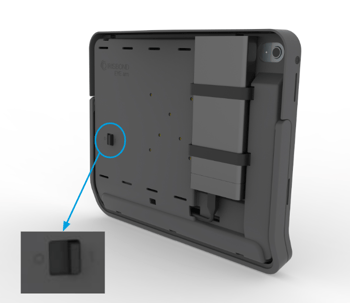
#### 3. Turn the iPad ON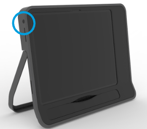
Use the button on the left upper side of the tablet to wake up or turn the iPad ON
---
#### 
#### 4. Turn ON eye tracking
This switch activates the Hiru eye tracker.
Always keep in mind that the iPad has to be turned ON before you switch on the eye tracker!
---
#### 5. Wait about 15 seconds
After a few seconds, you will notice infrared lights appearing on both sides of the Hiru eye tracker, along with a white detection light in the center of the device.
The AssistiveTouch menu , and pointer will appear automatically on screen.
---
#### 6. Open Hiru App and Calibrate
Find more information regarding the Hiru app **[here](https://knowledge.irisbond.com/en/ipad/hiruapp/what-is-the-hiru-app?hsLang=en) 👆**
---
#### 7. Personalize your Assistive touch menu, and other iPad settings and start using your iPad just with eye gaze
Find detailed information in the "settings" section **[here](https://knowledge.irisbond.com/en/hiru-ipad?hsLang=en#settings) 👆**
- [Frequently Asked Questions](https://knowledge.irisbond.com/en/frequently-asked-questions?hsLang=en#main-content)
- [iPad](https://knowledge.irisbond.com/en/frequently-asked-questions?hsLang=en#ipad)
- [Hiru](https://knowledge.irisbond.com/en/hiru?hsLang=en#main-content)
- [Release notes](https://knowledge.irisbond.com/en/hiru?hsLang=en#release-notes)
- [Eye tracking basics](https://knowledge.irisbond.com/en/hiru?hsLang=en#eye-tracking-basics)
- [Hiru & Windows](https://knowledge.irisbond.com/en/hiru-windows?hsLang=en#main-content)
- [Easy Click](https://knowledge.irisbond.com/en/hiru-windows?hsLang=en#easy-click)
- [Systray](https://knowledge.irisbond.com/en/hiru-windows?hsLang=en#systray)
- [Settings](https://knowledge.irisbond.com/en/hiru-windows?hsLang=en#settings)
- [Hiru & iPad](https://knowledge.irisbond.com/en/hiru-ipad?hsLang=en#main-content)
- [Set-up](https://knowledge.irisbond.com/en/hiru-ipad?hsLang=en#set-up)
- [Hiru App](https://knowledge.irisbond.com/en/hiru-ipad?hsLang=en#hiru-app)
- [Settings](https://knowledge.irisbond.com/en/hiru-ipad?hsLang=en#settings)
- [iPadOS](https://knowledge.irisbond.com/en/hiru-ipad?hsLang=en#ipados)
- [Applications](https://knowledge.irisbond.com/en/hiru-ipad?hsLang=en#applications)
- [Usage](https://knowledge.irisbond.com/en/hiru-ipad?hsLang=en#usage)
- [Oskol iOS](https://knowledge.irisbond.com/en/hiru-ipad?hsLang=en#oskol-ios)
- [Oskol 2](https://knowledge.irisbond.com/en/hiru-ipad?hsLang=en#oskol-2)
- [Versa Eye](https://knowledge.irisbond.com/en/hiru-ipad?hsLang=en#versa-eye)
[](http://irisbond.com)
Centro de ayuda irisbond.com
[mailto:email@email.com](mailto:email@email.com)
Copyright © 2026, IRISBOND