The Hiru App includes a section that allows users to customize and personalize their app and calibration settings. Let's explore all the features that can be found in the SETTINGS folder.
Hiru App Dwell time
The Hiru App allows users to customize and personalize their app and calibration settings. One important setting is the dwell time, which determines how long your eyes need to stay fixed on one point to perform a click. This dwell time is specific to the Hiru App and can be adjusted within the app. However, if you want to change the dwell t ime outside of the Hiru App, you can do so in the settings of your iPad.
Here are some recommendations for setting the dwell time based on different stages of use:
- Early stage 1 - first steps: It is recommended to set a very short dwell time of 0.5 seconds. This allows the user to quickly experience the power of their eyes in controlling the app.
- Early stage 2 - context-dependent: To make intentional clicks and navigate the screen at the same time, it is best to set a dwell time of 1-1.5 seconds. This provides a balance between accuracy and ease of use.
- Independent user profile: For experienced users, it is suggested to set the dwell time to 1 second and make further adjustments according to personal needs and preferences. This allows for a customized and efficient user experience.
*Keep in mind that even for independent users, the first time using eeye gazemay require a higher dwell time as they get accustomed to the options. Use a longer dwell time or the "pause" button in the upper right corner of the Hiru app to help.
By adjusting the dwell time in the Hiru App settings, users can optimize their interaction with the app and tailor it to their specific requirements.
Smoothing
The smoothing setting in the Hiru App determines how sensitive and fast the pointer (eye gaze) moves. Lowering the smoothing increases the speed and sensitivity of the pointer to eye movements. There are two places where you can adjust the smoothing on an iPad:
- Within the Hiru App: adjusting the setting here will set the smoothing for inside and outside of Hthe iru app.
- In the iPad settings: adjusting the setting here will set the smoothing only when using AssistiveTouch (not inside the Hiru app)
Note: If you want your pointer (eye gaze) to move very quickly, set the smoothing to a low value in both the Hiru App and the iPad settings.
Recommendation: For users with head or eye movements set the smoothing to a high value. This helps minimize any unintended pointer movements and provides a more stable user experience.
Visible Pointer
If you prefer not to have a pointer displayed within the Hiru App and would rather rely solely on your eye gaze, you can toggle the visible pointer OFF.
This setting will be in place only within Hiru App.
Positioning LED
We recommend keeping the detection light ON, but if you find the bright white light on the top of the camera to be too distracting, you have the option to toggle it OFF in this location.
This setting will be in place inside and outside of Hiru App.
Eye control mode 
In this section, you can select if the user is going to control the full iPad with one eye (left or right) or both eyes.
This setting is very helpful if one of your eyes is partially closed or has difficulty focusing. It ensures that the app recognizes and responds to the movements of the selected eye(s) accurately, providing a more comfortable and efficient user experience. So, if you have any difficulties with eye alignment or control, the eye control mode in the Hiru App can be a valuable tool to enhance your interaction with the iPad.
Calibration settings 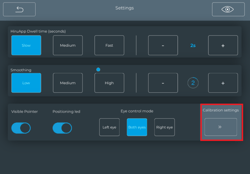
The calibration settings button opens a range of options where you can customize your calibration. Here, you can adjust the speed of the target (the dot) movement during the calibration. You can also choose the size of the target and personalize the background and target color as you like.
Recommendations:

- Speed: Set to slow for first-time calibrations, or for users who need longer processing time. Fast for higher calibration points (9 or 16).
- Size: Larger targets are helpful for low vision users.
- Color: For low vision users, try using high contrast colors (ex. black background with a yellow target). In a room with a lot of light select a lighter background color to prevent reflections on the iPad
Explanatory notes:
![]() - These settings apply exclusively to the Hiru App
- These settings apply exclusively to the Hiru App
![]() - These settings apply to the entire iPad, including the Hiru App.
- These settings apply to the entire iPad, including the Hiru App.