Positioning and calibration
How to position the device for correct eye tracking? How to calibrate? How many calibration points do you recommend? What is step by step calibration?
Getting the positioning and calibration right is important when it comes to eye tracking. These steps have a direct impact on the accuracy and reliability of the results you'll get. So, to make sure you get precise and consistent data, it's crucial to perform these actions correctly. You can find both of them inside the Hiru App in the Calibration section.
Positioning tool
As a first step, it is crucial to find the correct position of the device. The positioning tool within the Hiru App helps you find the perfect position for the Hiru eye tracker. It's important to feel comfortable in this position and maintain it throughout the eye-tracking session for accurate results.
Remember:
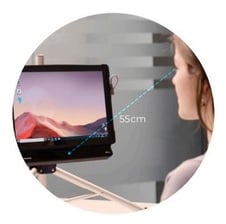
- The Hiru should be about 55 cm from your
face

- The top of the screen is in line with your eyes
- The screen is parallel to your face and at the same angle for optimal calibration.
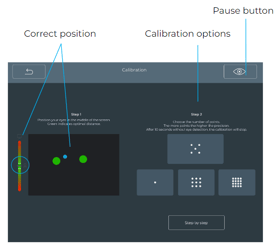
Ensure that your eyes are positioned in the center of the black rectangle and that they appear in green. On the left side, there is a bar that indicates the distance between your eyes and the screen. If you get too close, the line on the bar will move up, and if you are too far, the line will be too low. It is important to keep the line on the bar in the middle for optimal calibration.
Tip: For smoother positioning, you can pause the screen in the right top corner
Calibration options
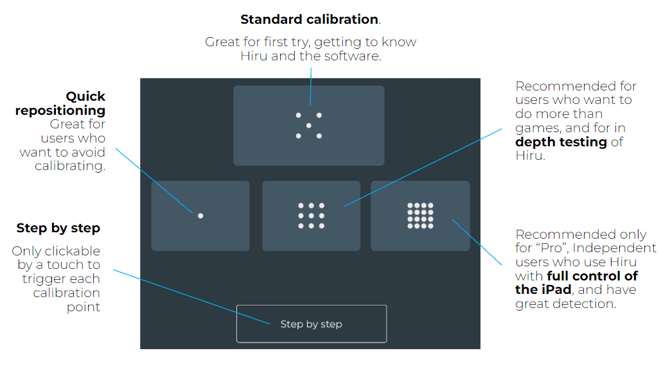
Once you have found the optimal position for your device, you can proceed to the next step of calibration. But how many calibration points should you choose? Choose the number of points appropriate for the use. Activities with larger targets require fewer calibration points, smaller targets require more calibration points. So, it is recommended to select a larger number of calibration points for a more precise eye gaze experience.
Note: Although using more calibration points results in higher accuracy for independent users, not all eye gazers need a 9 or 16 point calibration.
For those using Hiru for Early stage games, Symbol communication, or other apps with large cells, start with a 1 or 5 point calibration.

Tip: For beginners use Step by step calibration
Step-by-step calibration
To initiate a step-by-step calibration, begin by selecting the "step-by-step" button. Once activated, the button will turn blue. Next, specify the desired number of calibration points. Typically, step-by-step calibration involves fewer points, such as 5. This method is designed for users who may struggle to focus on the entire calibration process, particularly Early-stage users who have a person assisting them.
In the step-by-step calibration, the caregiver guides the user by indicating which corner to focus on. The caregiver waits until the user is looking in the designated direction, then taps the screen to initiate the calibration for that specific point. This process is repeated for each calibration point. The objective is to enhance calibration accuracy, resulting in an improved eye gaze experience, especially beneficial for early-stage users or those facing more distractions
Calibration results
Once the calibration is completed, your calibration results will be displayed automatically. The best result is when all the dots are green. If you see any red dots, it means there may be room for improvement in your calibration. You can click on improve and you will repeat the calibration only of your three worst points.
Note: If you calibrate when selecting one eye tracking, make sure you click on the eye you calibrated with to see the calibration results!
