What is calibration?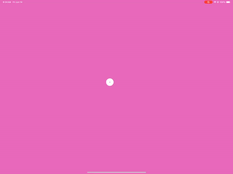
Calibration is a crucial step in utilizing eye tracking technology to ensure precise and efficient tracking. Through calibration, the eye tracker adapts to the user's eyes, adjusts to the lighting conditions in the environment, and accurately scans the positions of the eyes. This leads to highly accurate eye tracking, allowing the user to control the device with their eyes. It is essential to remember that calibration is a fundamental step when using eye tracking. Therefore, after connecting an eye tracker, the next necessary steps are positioning and calibration.
When do you need to calibrate?
Calibrate your eye tracker in the following situations:
- When starting a new eye tracking session
- When there are significant changes in lighting conditions
- When you change your position
- If you start to notice inaccuracies in the eye tracking
Calibration points
You have the option to choose between 1, 5, 9, or 16 calibration points for your eye tracker. Remember that the more calibration points you use, the higher the accuracy. However, it is important to note that a higher number of calibration points will also require a longer calibration time.
For beginners, it is recommended to start with either 1 or 5-point calibration. If you are an advanced user looking for precise control, especially for small buttons, opt for the 16-point calibration. You can check more specific recommendations here, under Calibration options.
🎯Choose the number of calibration points you want to use. Once the calibration begins, follow the targets that appear on the screen. If the calibration target is a dot, make sure to focus on the small dot inside the target for accurate calibration.
Check the calibration process:
- In Windows (inside of the EasyClick)
- In iPad (inside of the Hiru App)
Check the calibration in Windows - in Easy Click or in iPad in the Hiru App.
.png?width=283&height=80&name=01%20EasyClick%20(1).png)
Calibration results
Once the calibration is completed, your calibration results will be displayed automatically. The best result is when all the dots are green. If you see any red dots, it means there may be room for improvement in your calibration. You can click on improve and you will repeat the calibration only of your three worst points.